Fleet Orders: Difference between revisions
DerSaveBob (talk | contribs) Created page with "__TOC__Within HEGA's graphical interface, you'll find the menu item "Fleet Overview". From there, you can access the fleet commands, which provide you with a variety of options to actively use your fleets stationed on the planet. <br> <br> <div class="toccolours mw-collapsible" id="mw-customcollapsible-ein001"> <div class="mw-customtoggle-ein001 wiki-menu-button" style="font-weight:bold;line-height:1.6;color:red">Screenshots </div> <div class="mw-collapsible-content"> ..." |
(No difference)
|
Revision as of 12:20, 28 May 2025
Within HEGA's graphical interface, you'll find the menu item "Fleet Overview". From there, you can access the fleet commands, which provide you with a variety of options to actively use your fleets stationed on the planet.
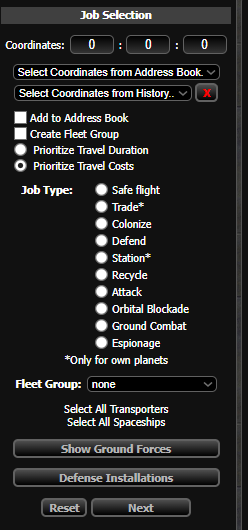
To execute any fleet command, you need a target planet. In the explanation of each fleet command, this is simply referred to as "planet selection". But how do you access this selection?
- Planet Selection
- Via the Galaxy Map
- Open the galaxy map and find a (preferably uninhabited) planet
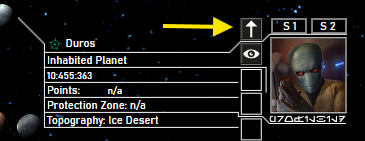
- Click on it.
- Click on Approach (small upward-facing arrow).
- Via a coordinate list
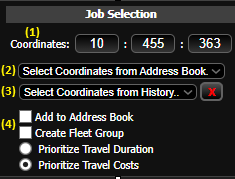
- Select a planet from your address book list (2) or your history list (3)
- Via manual coordinate entry
- Enter the available coordinates into the coordinate field (1)
- Via the Galaxy Map


Tip: You can save the entered coordinates in your address book by checking the box "add to address book" (4).
Each of the following fleet commands can be cancelled during flight time, as long as the remaining time is more than 1 minute. If less than one minute remains, the flight can no longer be cancelled! A return flight, logically, also cannot be cancelled.
What is a Safe Flight?
A safe flight is used to protect resources and ships from enemy attacks and to hide ground troops from scans. During a safe flight, the sent resources and ships are not attackable or reachable by any player.
When should I use a Safe Flight?
- As soon as you leave the computer for more than an hour: send away your resources! (All ships? That’s up to you. A strong defense doesn't necessarily need to be saved). Send everything on a safe flight until you return. Test the flight time to nearby planets for optimal timing.
- The same applies if you're going to do sports, visit friends, go to work, or go to sleep. If the enemy gets no loot and suffers damage, they're less likely to attack.
How do I start a Safe Flight?
- Select the target planet
- Select the ships to send
- Choose “Safe Flight” as the mission type on the left
- Click “Next”
- Set the flight speed (both for arrival and return)
- Load the cargo hold with resources (or with ground troops)
- Start the fleet
Safe Flight to Enemy Planets
Unlike the "Attack" command, safe flights do not approach the planet directly. They turn around near the target and return to the origin planet. This means safe flights do not engage in combat! Be aware that enemy players can see your inbound safe flight. It’s better to fly to NPCs!
Tips
- Saving only your ships protects them, but your resources remain mostly unprotected.
- In general, make yourself as unattractive a target as possible. The more unguarded resources you have, the more interesting you are to potential attackers. No resources for the enemy! Every resource they loot helps them build or buy new ships to send after you. If their attack succeeds, they’ll likely come back. Credits cannot be looted. So at the very least, save your resources when you're away from the PC.
- Few resources and a strong defense fleet discourage many attackers (though not all—debris fields from your fleet can also be tempting).
- Save for longer periods to be sure you're back when the fleet returns with your resources. Don’t let them arrive at 3 AM if you wake up at 7 AM—your stuff might get looted. Upgrading your bunker also gives you a helpful buffer.
- “The cargo plus travel costs are not available!”—this message sometimes appears due to rounding errors. To avoid it, wait 5–10 seconds after loading your fleet before sending it off. That way, newly generated unspent resources will be available to pay the flight cost.
Will the Safe Fleet be attacked if the target has defenses?
- No. Safe flights do not “land” on the target planet. They turn around beforehand and return safely.
The fleet command "Trade" can be used to transport resources to one of your own planets. To do this, select a sufficient number of transport ships in the fleet overview and choose the fleet command "Trade". The transporters used will automatically return to their origin planet after delivering the resources.
The fleet command "Trade" can only be sent to your own planets. It is not possible to use it to transfer resources to other players. It is also not possible to send ships to allies this way.
The fleet command "Colonize" is used to colonize new planets. Colonization can only be successful on previously occupied planets.
To colonize a planet, select the fleet command "Colonize" and send a colony ship to an occupied planet.
There are 2 conditions that must be met in order to colonize a planet:
1st Condition:
The respective protection zone defines the maximum number of colonies that can be established. For example, if 3 colonies have already been established in PZ3, NO additional colonies can be founded, regardless of your colonization tech level! However, you can save your colonizations for a higher PZ, e.g. PZ7, and establish the maximum possible number of colonies there. That is up to each player.
| Protection Zone | Max. Number of Colonies |
|---|---|
| 0 | 0 |
| 1 | 1 |
| 2 | 2 |
| 3 | 3 |
| 4 | 4 |
| 5 | 5 |
| 6 | 5 |
| 7 | 5 |
2nd Condition:
For every 10 levels in Colonization Tech, and if the 1st condition is fulfilled, one colony can be founded.
| Colonization Tech Level | Number of Planets |
|---|---|
| 0–9 | 1 Homeworld |
| 10–19 | 1 Homeworld, 1 Colony |
| 20–29 | 1 Homeworld, 2 Colonies |
| 30–39 | 1 Homeworld, 3 Colonies |
| 40–49 | 1 Homeworld, 4 Colonies |
| 50 | 1 Homeworld, 5 Colonies |
Special Rule: Raid Colony
You can establish a maximum of 4 raid colonies, which are unlocked at Colonization Tech levels 15 / 25 / 35 / 45.
Explanation and Conditions
The fleet command "Defend" is used to support an alliance member. You select a specific number of ships that will protect your ally's planet from attacks or attempt to break a blockade. The following conditions apply:
- - A defense fleet can only be received every 6 levels of the Command Centre.
- - The minimum size of a defense fleet must be 50 ships multiplied by your zone level!
- - The minimum size of a defense fleet must be 50 ships multiplied by your zone level!
Defending incurs upkeep costs. These are deducted from the sender when the fleet is launched. If these cannot be paid, the defense fleet cannot be started.
Example:
A player from Zone 3 wants to send a fleet => 50 x 3 = at least 150 ships
How to Send a Defense Fleet
- Select target planet
- Select ships
- Choose the "Defend" fleet command
- Click Next
- In the next window, you can adjust the travel time to precisely determine when the fleet will arrive.
- You can also set the duration of the defense (6h, 12h, 18h, 24h). Keep in mind that after this time ends, the fleet will automatically return to the original planet – possibly while you're offline.
- Click "Start Fleet"
Combat Script Mechanics
During Defense
When defending, the defending fleet and the fleet of the planet owner are treated as a combined force. This means that all ships fight together. For the attacker, this means they must face all defending fleets.
Losses are shared proportionally among defenders based on the number of ships they contributed.
Formula: Number of losses of ship type n / (number of ship type from Defender A + Defender B + ... + Defender n) * number of ships of ship type n sent
Example:
Defender A contributes 10 X-Wings
Defender B contributes 90 X-Wings
20 X-Wings are destroyed, so the losses are distributed as follows:
A = 20/(10+90)*10 = 2 X-Wings
B = 20/(10+90)*90 = 18 X-Wings
Important: If only one defender sends a specific ship type (e.g., X-Wings/T-Fighters) and they are all destroyed, that player will lose all of them.
Therefore, it is advisable that each player sends a variety of ship types to distribute losses more evenly.
If the planet owner's fleet, defense structures, and all defending fleets are defeated, the attacker will receive resources as with a normal attack.
Debris field calculation is also the same as in a regular attack.
Breaking a Blockade
If the "Defend" command is used on a planet currently under blockade, the defending fleet will engage the blockade fleet. The blockade will be lifted if the fleet is destroyed. Note: The blockade fleet is NOT split during this defensive flight!
The "Station" fleet command is used to send ships, ground forces, and resources from one planet to another. Important notes:
- The fleet command can only be used on your own planets. It is not possible to apply it to foreign planets.
- All units selected for this command will permanently relocate to the target planet. The transporters will not return to the original planet.
The "Recycle" fleet command can be applied to any planet. In the galaxy map view, you can use the recycling icon to directly send recyclers — even proportionally to the size of the debris field.
When launching the recyclers, you can choose how the cargo bay should be filled with resources from the debris field. For example, if Durasteel is set to 30%, then 30% of the cargo bay will be filled with Durasteel. If there is leftover space after the first loading round (because fewer resources were available than requested), the remaining capacity will be filled with other available resources in the next round.
It is recommended to send recyclers to planets where a battle is expected soon, so they can arrive before recyclers from other players.
The "Attack" fleet command is, along with the save flight, one of the most important commands in Hega. With it, you can initiate a space battle to eliminate the enemy space fleet.
Battle Procedure
- Select target planet
- Select the ships to be sent
- Combat ships to eliminate enemy defenses
- Transporters to take the resources stored on the planet
- Select "Attack" on the left under mission type.
- Click Continue.
- Set the flight speed (you can adjust both the outbound and return speed).
- Under loading priorities, set which resources you want to collect and in what proportions.
- Launch the fleet.
Tip: Always start a spy mission in advance to see if the enemy has any defenses! Shortly before your fleet arrives, you should launch another spy mission to avoid losing ships.
Battle Reports
At the end of the battle, you’ll receive a report listing all ships from both players and a round-by-round combat summary. It will also display the resulting debris field and any plundered resources. Resources protected by the bunker are not shown. Below the battle report is a button to export the report. Keep in mind: exported battle reports are publicly visible if someone has the link. So think carefully about who you share the report with!
Limitations
Within a 24-hour period, a player can only attack the same planet up to three times. Additionally, the same planet can only be attacked up to nine times total during the same period. These limitations provide the defending player some time to respond and recover. However, the same player can still be attacked on their other planets. Only fully completed attacks count toward these limits—aborted flights do not. Declaring War removes the limit on attack flights.
Instructions for Orbital Blockade Requirements:
- The attacking and defending player involved in the blockade must belong to the same alliance and be in the same protection zone.
- All planets of a player can be blockaded, except for the main planet.
- This rule also applies to Raid Colonies, which can likewise be blockaded via orbital blockade.
Procedure of Orbital Blockade
- The attacker uses the "Orbital Blockade" fleet command to target the planet. Note that a player can only send a maximum of 2 blockade flights to the same target planet at the same time. This includes outbound flights, active blockades, and return flights from blockades.
- A regular space battle will occur.
- If 30 or more capital ships (class 3 + 4) survive the battle, the planet is considered blockaded.
- As of version V4.4, resources will also be loaded from the blockaded planet onto your ships, depending on the load capacity of the attacker/blockading fleet, via the "Orbital Blockade" command.
What happens on the blockaded planet:
- Resource production is automatically set to 100% upon the start of the blockade (battle won & capital ship requirement met) and cannot be changed while the blockade is active.
- The player whose planet is blockaded cannot conduct trade actions (including the black market) from that planet.**
- They also cannot initiate construction of buildings, ships, research, or energy cells from that planet.**
- No ships can be launched from the blockaded planet.**
(**Except for tasks that were started before the blockade began.)
Advantages for the blockading player:
- The blockaded planet’s resource production is forced to 100%.
- The attacker can launch an attack on the blockaded planet (e.g., with transporters), giving them the opportunity to collect all resources produced during the blockade.
How to lift a blockade:
- The blockading player voluntarily lifts the blockade.
- The blockaded player or one of their alliance members sends a fleet with the "Defend" fleet command to destroy the occupying fleet. If the occupying fleet is destroyed, the blockade ends.
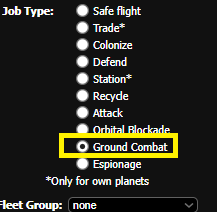
Since version 4.4, the "Ground Combat" command is available in Hega (see screenshots 1+2). This command replaces the previous "Occupy" command in the fleet orders structure, which is now only selectable as a sub-option of ground combat by ticking a checkbox (see screenshot 3).
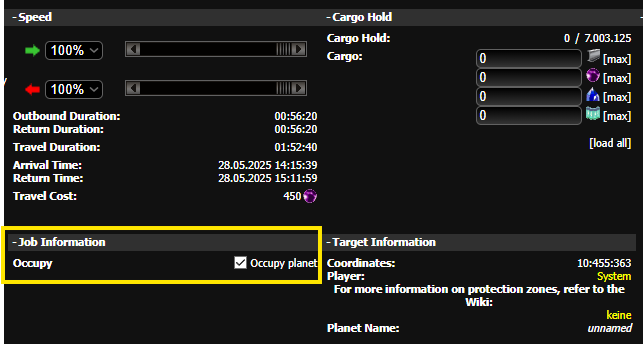
Before ground combat can be initiated, the enemy space fleet must be defeated using the Attack command.
In the second step, you send a fleet including ground units to the target planet using the "Ground Combat" command. A ground battle will then occur, in which enemy ground units — and, since version 4.4, any inactive space units (Maintenance Costs) — will be destroyed.
If the planet is to be occupied — either to garrison an enemy colony or to prepare for Colonization — the checkbox visible in image 3 must be ticked before launch.
To successfully occupy a planet, at least 30 ground units of class 3 (Light Vehicles) or class 4 (Heavy Vehicles) must survive the ground battle.
Planetary occupation is subject to the usual colonization level rules.
Important: You cannot occupy or conquer enemy planets or colonies beyond your allowed number of planets.
With the "Ground Combat + Occupy" command, it is now also possible to deliver spaceships and resources to the occupied planet without an additional stationing command.
Warning!
A planet can only be occupied for a maximum of 7 days!
Probes
The espionage units in Hidden Empire are divided into two tiers. For each tier, a probe can be built with the appropriate research level. The higher the tier, the more expensive the probes, but they provide more information.
Available espionage levels (probes):
| Planetary Espionage | Fleet Movement Espionage |
|---|---|
| Level 1 | Level 2 |
| Sensor Tech 10 | Sensor Tech 25 |
| Target name | |
| Target coordinates | |
| Target points | |
| Resources on the target planet | |
| Building levels | |
| Research levels of the target | |
| Ships on the target planet | |
| Ground troops on the target planet | |
| Number of defense structures | |
| Blockade fleet visibility | |
| Defending fleet visibility | Active defending fleet of the target planet |
| Attacking fleets visibility | |
| Occupation fleets visibility | |
Requirements
To perform espionage, the target must not be located in Protection Zone 1, be in vacation mode, or be under protected account suspension.
A new feature is that you can now also spy on your own intelligence (BND) partners and alliance members.
The functions Save Flight, Trade, Colonize, Station, and Recycle cannot be scouted by any probe!
Success Chance
Base success chance: 0.65
+0.01 per level of your own Sensor Tech
−0.01 per level of the target's Sensor Tech
Report types (for the spied-on player):
For each successful probe:
40% full report
40% report without coordinates (otherwise complete)
10% report with probe type only (no player name)
10% no report at all
That means the individual probabilities of the report types always depend on the probe’s overall success chance.
Example:
If you have Sensor Tech 15 and your opponent has Sensor Tech 30 (0.65 + 0.15 − 0.30 = 0.5 → 50% success chance), here are the outcomes for your opponent:
- 50% probe failure: full report for target, no info for you
- 20% (50% * 40%) full report for target, normal info for you
- 20% (50% * 40%) report without coordinates for target, normal info for you
- 5% (50% * 10%) probe type only (no name) for target, normal info for you
- 5% (50% * 10%) no report for target, normal info for you
Accuracy:
Report accuracy increases with your own Spy Tech (independent of the target’s Sensor Tech).
At Spy Tech level 0, the deviation is up to ±25%; at level 50, it's reduced to ±5% (0.4% less deviation per level).
Additionally, there's a 0.5% chance that a ship type is not shown at all in the scan — so if you notice a missing ship type (e.g. in an NPC scan), it's best to scan again!
Canceling Espionage
Once a probe or fleet has less than 1 minute remaining until it reaches its target, the espionage mission can no longer be canceled!
Special Notes on Probes
- A probe is destroyed after completing its mission (regardless of success or failure).
- The success chance depends only on the above factors — sending multiple probes does not increase it!